How to Teach Students to Copy and Paste on a Computer (Easy Tech Lesson for Beginners)
I’ve been teaching technology to K–5 students long enough to know this: teaching kids how to copy and paste is an important skill - but teaching a 2nd grader how to actually do it can be complicated. That’s why it’s essential to teach copy and paste effectively.
And maybe that’s why I have so much patience with them. Because for me, copy and paste never came naturally either.
I learned how to type on a typewriter, not a computer. In college, I took an Intro to Computers course, but we only sat at the computers maybe two times that entire semester. When the instructor tried to explain copy and paste, it felt like a completely different language. It made no sense at all.
It wasn’t until the summer after taking that course, when I wanted to find an office job, that it finally clicked. My brother sat me down at his computer and walked me through the built-in Microsoft Word tutorials. That was the first time I really understood how to copy and paste.
So when I’m teaching my students, I remember what it felt like to be confused by something that seems simple now. That’s why I created a digital sticker poster project - because copy and paste can be taught in a way that’s fun, approachable, and confidence-building.
Why Start with Stickers Instead of Text?
When you teach copy and paste, text can be tricky for beginners. Highlighting words or sentences requires precision, and it’s easy for kids to get frustrated if they grab too much or too little.
That’s why I start with images. Clicking a sticker once is easier and gives students success right away. They can clearly see when they’ve copied something and where it appears when they paste it. Once the concept of “make a copy and move it where you want” is mastered, then we build toward applying the same skill with text.
This scaffolding makes the learning process smoother and confidence-building.

How to Copy and Paste on a Computer: Methods for Students
Keyboard Shortcuts (Fastest Way)
The easiest and most universal way is using keyboard commands:
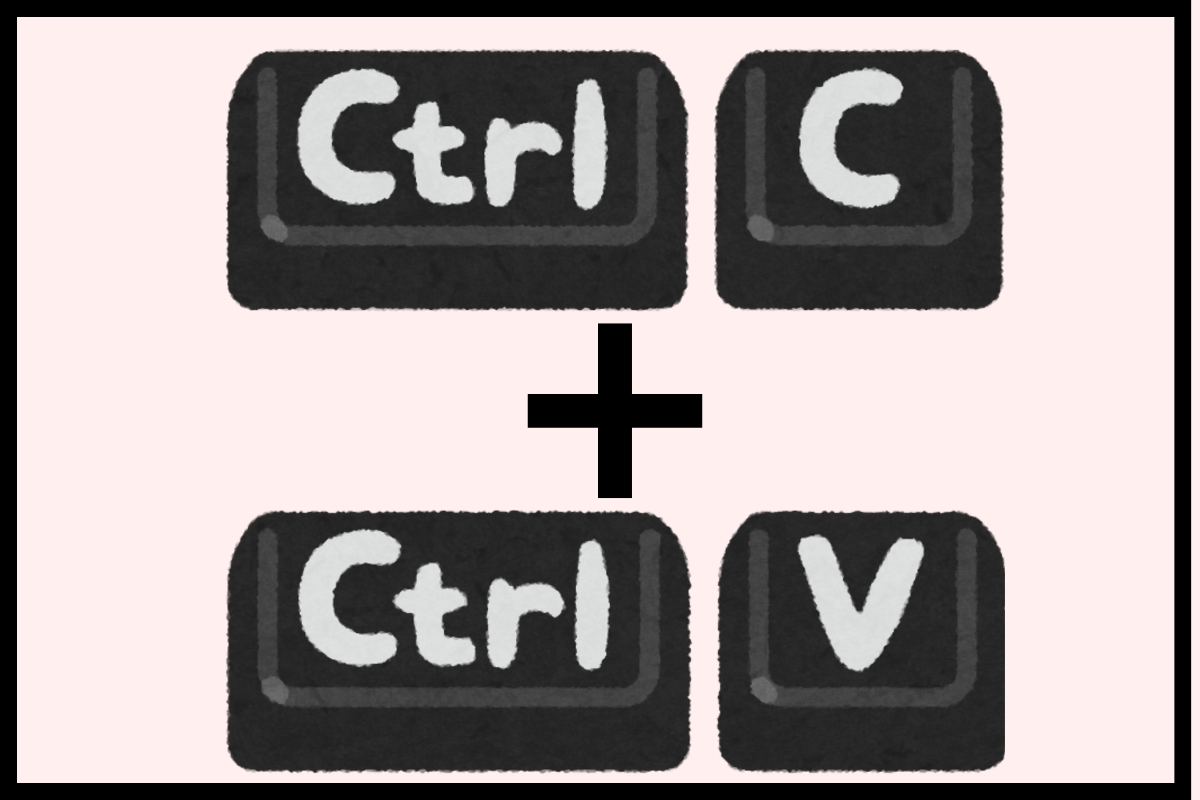
Copy → Press Ctrl + C (Windows PC)
Paste → Press Ctrl + V
Remind students to hold down the Control (Ctrl) key first, then press the letter key.
Show them how the blinking cursor tells the computer where the new copy will go.
Right-Click Menu (Beginner-Friendly, but Limited in Google Apps)
If shortcuts feel too fast at first, students can also:
Click a sticker or highlight text.
Right-click and choose Copy.
Click in the poster area, right-click, and choose Paste.
Important note for Google Apps: In Google Slides and Google Docs, students often get a pop-up message telling them to use Ctrl + C and Ctrl + V instead of the right-click menu. I still show them the right-click method so they understand it exists, but I encourage them to rely on the keyboard shortcuts since that’s what actually works smoothly in Google tools.
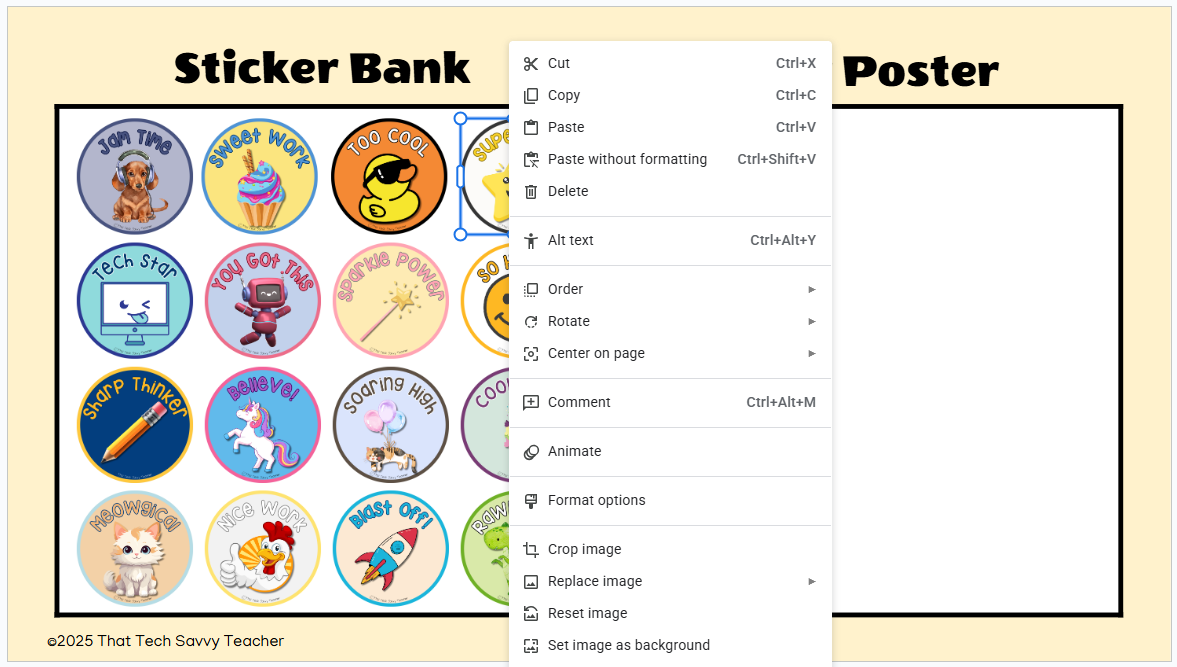
Edit Menu at the Top
For programs like Google Slides or Google Docs, the Edit menu also includes Copy and Paste. This can help students who learn best by seeing options written out.
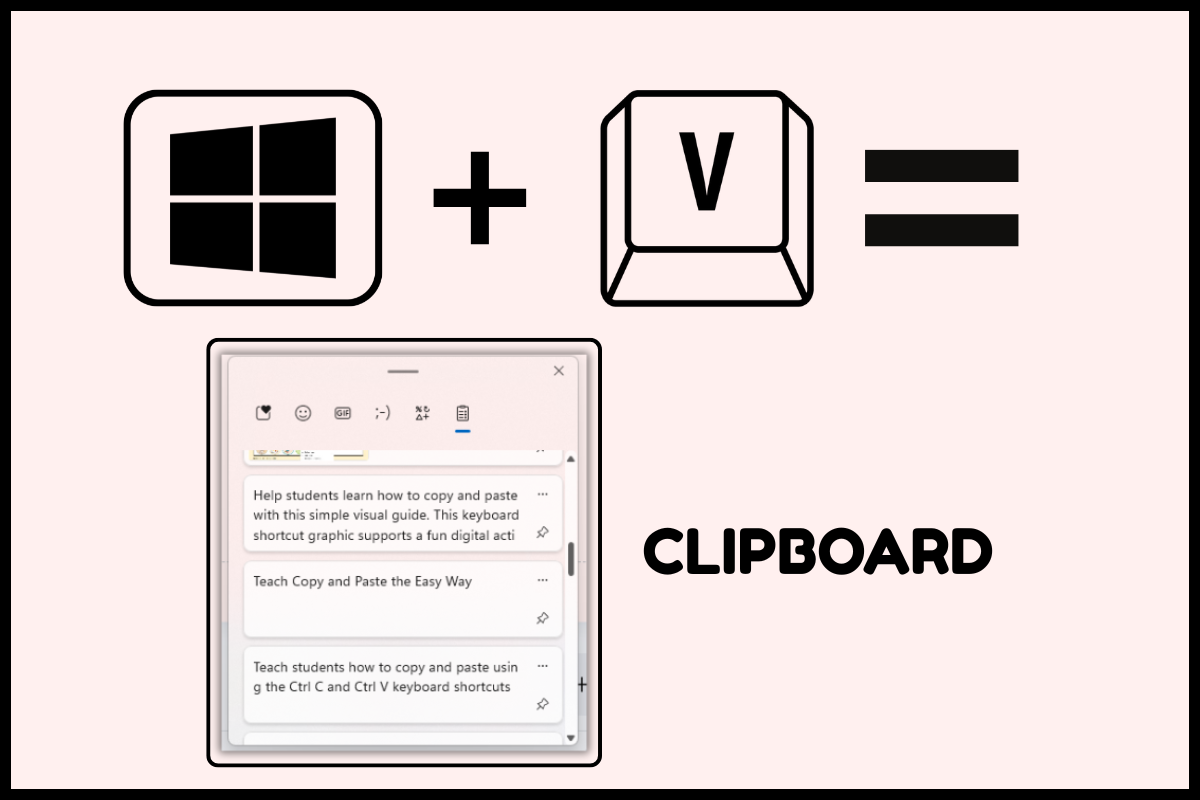
Clipboard History (Windows + V)
Here’s a hidden gem on Windows PCs: Clipboard History.
When students press Windows key + V, they can see everything they’ve copied recently - not just the last thing.
It’s especially helpful for beginners who aren’t always sure they copied something correctly:
They can double-check that their item is saved.
If they accidentally copy the wrong thing, they can still find the original.
It reinforces the idea that the computer’s clipboard is like a holding space for copied items.
Unfortunately, Apple’s macOS doesn’t have a built-in clipboard history like this. I wish it did - because it’s such a game-changer for students and teachers! If you know of a good workaround or app that works well on Macs, I’d love for you to share it in the comments.
Copy and Paste Classroom Project: Digital Sticker Poster
Here’s how it works:
Students start with a digital poster that includes a Sticker Bank on the left and an empty Poster area on the right.
To add a sticker, they click on the image → press Ctrl + C → click in the blank poster area → press Ctrl + V.
Once the sticker appears, they can drag it into position.
Students must add at least five stickers to finish their poster. They can repeat favorites or explore the full set.
This project gives students multiple chances to practice copy and paste in a way that feels like a game. By the time they’re done, the steps have started to become muscle memory.
Student Walkthrough Video
One of the best parts of this activity is that it comes with a step-by-step student video. I recorded the directions in kid-friendly language so your students can watch and follow along at their own pace.
This means:
Students can pause and rewind if they need to.
Teachers don’t have to stop and repeat instructions over and over.
Even younger learners (like my 2nd graders) can complete the project independently after watching.
The video link is provided directly to teachers, so you can share it in Google Classroom or your learning management system (LMS) of choice. That way, students always have access to clear directions, right where they need them.
Ready-to-Use Copy & Paste Activity
You can grab this exact activity for your own students through my store or on Teachers Pay Teachers. It’s well worth the small investment for a project that you can assign in Google Classroom or your LMS of choice, knowing your students can work through it independently.
The included video walks them through step by step. It really is that simple. My students responded so well to this project, and I am honestly proud of how it turned out. I don’t stress anymore about teaching copy and paste, because I know this lesson works!
Tips for Success When Teaching Copy and Paste
Hands up after shortcuts! Many students don’t pick up their fingers quickly after pressing Ctrl + V, and suddenly the page is filled with dozens of stickers. I always remind them: press the keys, then lift your hands right away.
Practice with repetition. Let them copy the same sticker multiple times. Repetition builds muscle memory and makes the process less intimidating.
Use images first, then text. Starting with stickers is simpler than highlighting words. Once they master the process with pictures, transition to copying and pasting text in Google Docs.
Troubleshoot together. If nothing pastes, check that the item was actually copied. Clipboard History (Windows + V) can help students verify what’s saved.
Wrap-Up
Copy and paste may feel like second nature to adults, but for many students, it’s brand-new. As a K–5 technology teacher, I know how important this skill is - but also how overwhelming it can feel for 2nd graders.
By starting with images instead of text, you can scaffold the process and give them a confidence-building first experience. With shortcuts, menus, and even Windows clipboard history, students will quickly feel like computer pros.
And the best part? You don’t have to create the lesson yourself. My ready-to-use sticker project and walkthrough video make it simple for teachers and fun for kids.
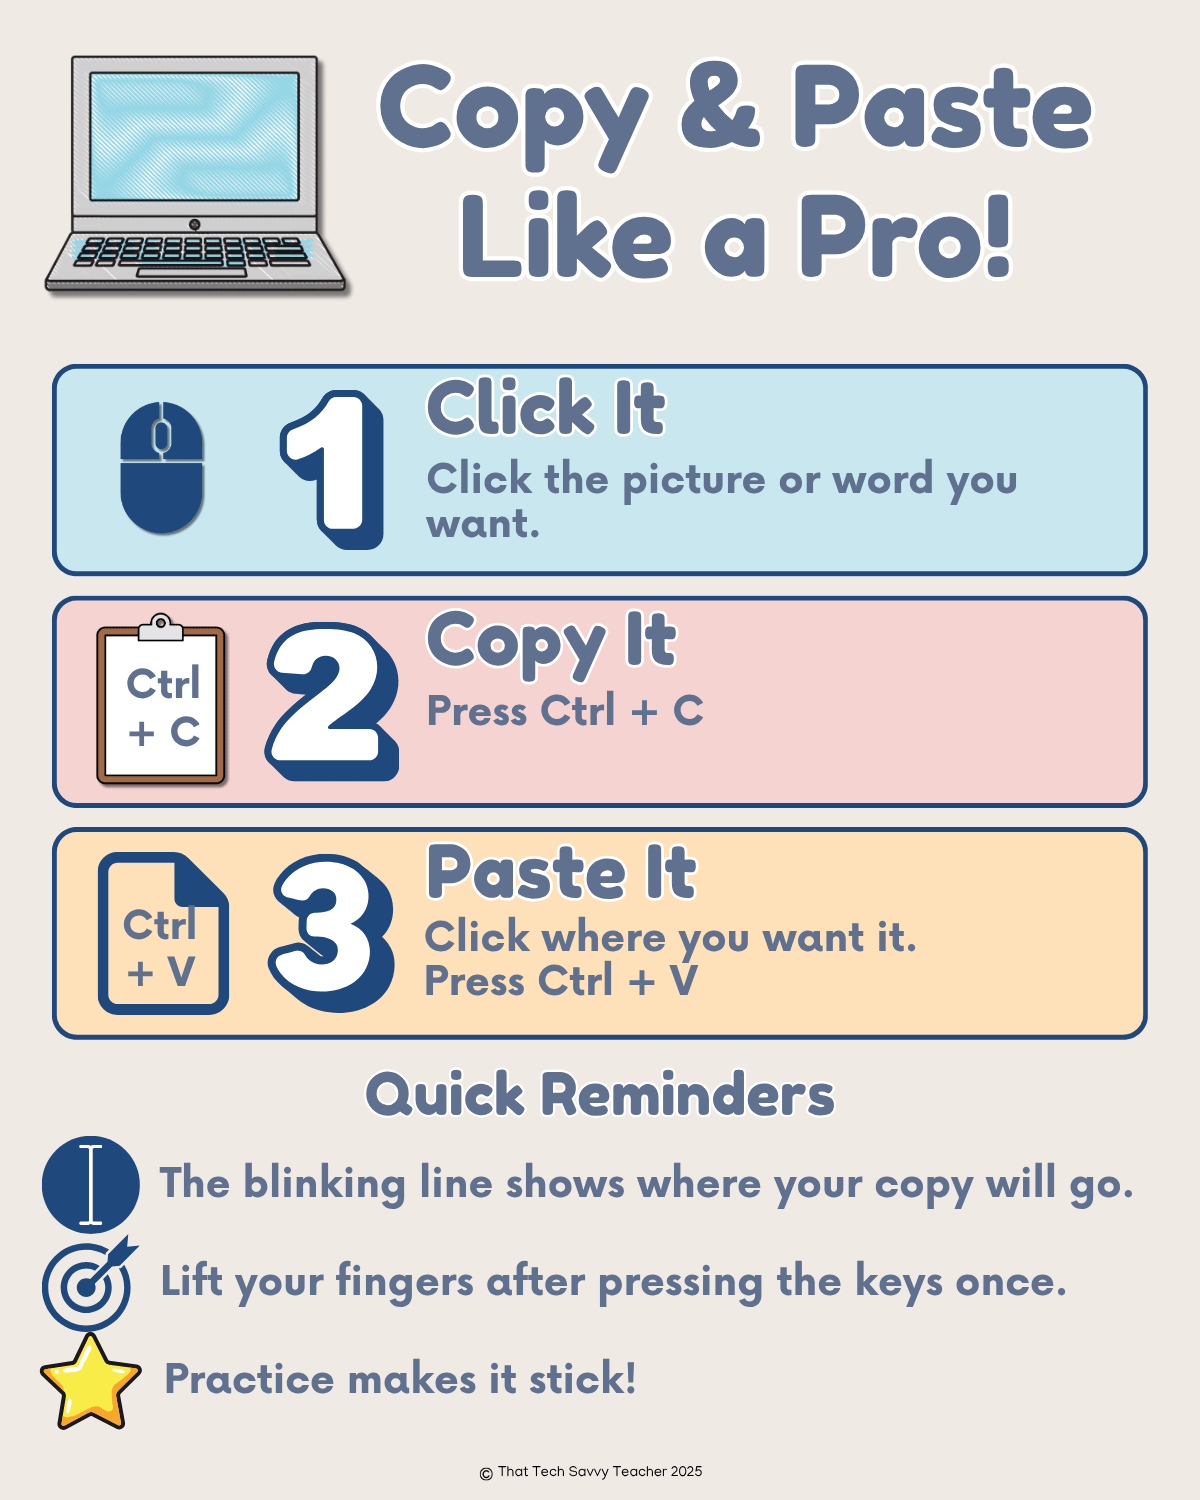
Free Classroom Poster
Want a visual to help your students remember the steps for copy and paste?
It's simple, kid-friendly, and perfect for your computer lab or Google Classroom page. Just enter your email below, and I'll send it straight to your inbox!